What Is an Ear Impression and Why Is It Critical for Hearing Aid Fitting?
Introduction – The Foundation of Every Custom Hearing Aid

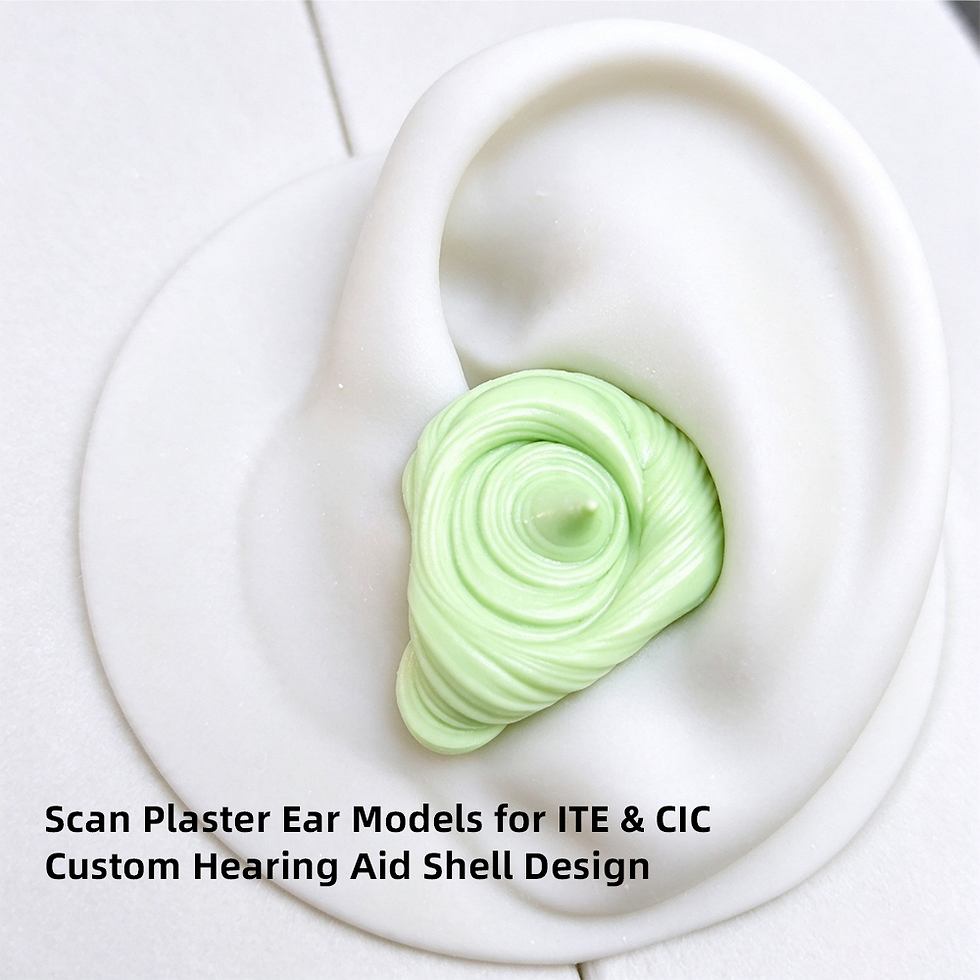
For any hearing care professional, the ear impression is the single most critical starting point for a successful hearing aid fitting. It is not merely a "mold" of the ear—it is a 3D anatomical blueprint that determines acoustic performance, physical comfort, and long-term wearability.
An inaccurate or poorly handled impression directly translates into a failed fitting: feedback (whistling), discomfort, slippage, and costly remakes.
3DIFY (a subsidiary of Jumyida Technology, founded 2015) manufactures the JME3 Ear Impression Scanner—a dedicated device designed to digitize the physical casting immediately after it is taken. While JME3 does not replace the clinical taking of the impression, it preserves its dimensional integrity by eliminating transport deformation and storage shrinkage.
This article explains exactly what an ear impression is, why its geometry matters so much, and how modern digitization safeguards its critical data.
What Exactly Is an Ear Impression?
An ear impression is a negative or positive replica of a patient’s external auditory canal and concha bowl, created using a biocompatible, viscous material that hardens within minutes.
Common Materials Used
Silicone-based materials – Preferred for their dimensional stability, low shrinkage (<1%), and tear resistance. They are the industry standard for high-precision custom shells.
Alginate (hydrocolloid) – Used less frequently today due to higher water-loss shrinkage, but still employed in some clinics for its cost-effectiveness.
Anatomical Structures Captured
A complete ear impression must capture three critical regions:
The Ear Canal (External Auditory Meatus) – Including the bony part (second bend) which provides retention.
The Concha Bowl – The bowl-shaped cavity that anchors the hearing aid body.
The Tragus and Anti-Tragus – The cartilage ridges that help lock the shell in place and prevent rotation.
The Standard Clinical Procedure – A Quick Overview
Otoscopic Examination – The clinician checks the ear canal for cerumen blockages, inflammation, or perforations.
Obtundation (if needed) – A small foam or cotton block is placed deep in the bony canal to protect the tympanic membrane.
Material Injection – The mixed silicone/alginate is slowly injected via a syringe, filling the canal and concha.
Setting and Removal – After 3–7 minutes (depending on material), the hardened impression is carefully withdrawn.
Inspection – The clinician checks the physical casting for tears, bubbles, or incomplete geometry.
Why Is the Ear Impression So Important for Fitting Success?
Critical Factor | Why It Depends on the Impression | Consequence of a Poor Impression |
Acoustic Seal / Occlusion | A perfect seal prevents amplified sound from leaking out and causing feedback (whistling). The impression captures the exact canal contour needed to occlude the ear fully. | Feedback/whistling; reduced gain; patient rejects the device. |
Mechanical Retention | The hearing aid must stay in place during jaw movement (talking, chewing). The impression captures the "second bend" undercuts that mechanically lock the shell. | The device falls out easily; requires constant adjustment or retention rings. |
Patient Comfort | The shell must distribute pressure evenly across the cartilaginous portions. An accurate impression ensures zero pressure points. | Soreness, irritation, or inflammation after short wear-time. |
Acoustic Directionality | The impression determines the exact position of the sound outlet relative to the eardrum, affecting high-frequency gain and sound localization. | Poor speech clarity in noisy environments. |
The "One Chance" Reality
Unlike dental crowns that can be adjusted chairside, a hearing aid shell is fabricated entirely in the lab based solely on this single physical impression. If the impression is flawed, the entire 2-3 week manufacturing cycle must be repeated.
The Physical Challenges – Why Traditional Impressions Fail
Even a perfectly taken impression faces risks after it leaves the ear:
Shipping Damage – The brittle tragus or canal tip can crack during postal transit.
Material Shrinkage – Alginate shrinks as it dries; silicone may change dimensionally over 24–48 hours.
Handling Abrasion – Repeated handling in the lab wears down fine surface details and undercuts.
These issues compromise exactly the critical factors listed above—seal, retention, and comfort.
The JME3 Digital Solution – Scanning the Physical Casting
Crucial Clarification: The JME3 does NOT scan the patient's ear directly. It is a dedicated Ear Impression Scanner that digitizes the physical silicone/alginate casting after it has been safely removed from the ear.
By integrating the JME3 into your workflow, you:
Digitize Immediately – Scan the impression within minutes of removal, while the patient is still in the clinic.
Perform QC Before Shipping – Use the high-resolution scan to inspect for bubbles, tears, or incomplete canal capture. If flawed, you can re-take the impression before the patient leaves.
Eliminate Shipping & Shrinkage Risks – Send the sterile, unalterable STL/PLY digital file to the lab, not the fragile physical casting.
JME3 Slogan: Quick, Accurate, Steady High-Quality Scans Made Easy with One Click
H2: Frequently Asked Questions (FAQ)
Q1: Does the JME3 scanner replace the ear impression-taking procedure?
A1: No. The JME3 is an ear impression scanner, not a clinical impression-taking device. It digitizes the physical casting after it has been taken. The clinical procedure of injecting material into the ear remains unchanged.
Q2: Does JME3 scan directly inside the patient's ear canal?A2: Absolutely not. JME3 scans the physical impression mold (the hardened silicone/alginate block) that has already been removed from the ear. The patient is not present during the scan.
Q3: Why is digitizing the impression better than sending the physical cast?
A3: Physical casts can break, shrink, or abrade during shipping and handling. A digital file preserves the exact geometry taken in the clinic forever, ensuring the lab receives error-free data with zero transit delays.
Q4: What file formats does JME3 export for the hearing aid lab?
A4: JME3 exports standard STL and PLY files, universally accepted by all major hearing aid CAD/CAM software platforms.
Conclusion – The Impression Is the Blueprint; Digitization Preserves It
The ear impression is the foundational blueprint for every custom hearing aid. Its geometry determines the acoustic seal, mechanical retention, and patient comfort. However, the physical casting is fragile and prone to degradation after removal.
The 3DIFY JME3 Ear Impression Scanner does not change how you take impressions—it changes how you protect them. By digitizing the physical casting immediately, you freeze its critical dimensions, perform instant quality control, and send immutable data to the lab.
Keywords: ear impression definition, hearing aid fitting accuracy, ear impression scanner JME3, physical casting digitization, acoustic seal hearing aid, custom hearing aid shell, 3DIFY, ear mold scanning.